Theo the Reindeer Free Crochet Pattern
- Elisa
- Sep 7, 2021
- 6 min read
Updated: Oct 14, 2022
Hi my fellow crafters! How's your week going?
I know, I know...last Tuesday I didn’t share any new projects, but I happened to spend a wonderful week in the upper part of Michigan with my hubby!
We finally had a little time off and we couldn’t ask for a better place and weather to spend some days in the nature.
Now that my batteries are recharged, I'm ready for new crochet adventures!
With the end of summer approaching fast, it's nice to start planning for the next holidays to come! ...and if you are looking for a Fall/Christmas project to work on, today's post may be just right for you!
A cute and chubby Reindeer on the same design as Coco the Rabbit and Rudy the Fox!
What do you all think? I'm in love with those little antlers!
___________________________________________________________________________________________
I made the infinity scarf with the Tunisian technique that allows you to obtain a wonderful knit-like look! Have you ever tried the Tunisian Simple Stitch?
Here on the blog you'll find the written instructions on how to work the scarf, but if you are new to this technique you can find many explanatory step-by-step pictures on the PDF version listed on my Etsy page.
If you are looking for a video tutorial on how to work with the Tunisian technique, make sure to check this helpful video
___________________________________________________________________________________________
So are you ready to make your own Theo the Reindeer?!
Here's the FREE pattern!
YARN: Light (3) in Rust, White, Sea Green; Classic Cotton Thread in Black
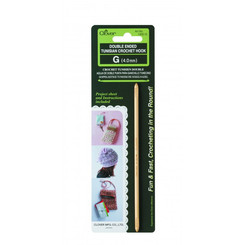
MATERIALS: C2 - 2.75 mm Hook (Tunisian) Crochet Hook 4 mm; Two 6 mm Black, Plastic Safety Eyes; Poly Filling; Yarn Needle
DIMENSION: H. 6” x W. 4”
ABBREVIATIONS: stitch (st), slip stitch (sl st), single crochet (sc), Tunisian simple stitch (TSS), fasten off (F/O)
SKILL LEVEL: Intermediate
Disclosure. Most blog posts on this website contain affiliate links. This means I get a small commission if you click-through & purchase (no additional cost to you).
BODY (beige yarn; 2.75 mm hook)
Rnd 1: 8 sc in a mr (8)
Rnd 2: sc inc around (16)
Rnd 3: (1 sc, 1 sc inc) rep around (24)
Rnd 4: (2 sc, 1 sc inc) rep around (32)
Rnd 5: (3 sc, 1 sc inc) rep around (40)
Rnd 6: (4 sc, 1 sc inc) rep around (48)
Rnds 7 - 11: sc even (48)
Rnd 12: (5 sc, 1 sc inc) rep around (56)
Rnds 13 - 18: sc even (56)
Insert the plastic safety eyes between rounds # 9-10, 9 stitches apart.
Rnd 19: (6 sc, 1 sc inc) rep around (64)
Rnds 20 - 31: sc even (64); start stuffing the body
Rnd 32: (6 sc, 1 sc dec) rep around (56)
Rnd 33: (5 sc, 1 sc dec) rep around (48)
Rnd 34: (4 sc, 1 sc dec) rep around (40)
Rnd 35: (3 sc, 1 sc dec) rep around (32)
Rnd 36: (2 sc, 1 sc dec) rep around (24)
Rnd 37: (1 sc, 1 sc dec) rep around (16); finish stuffing the body firmly
Rnd 38: sc dec around (8); F/O, close the hole and wave in ends.
MUZZLE (beige yarn; 2.75 mm hook)
Rnd 1: 6 sc in a mr (6)
Rnd 2: sc inc around (12)
Rnd 3: (1 sc, 1 sc inc) rep around (18)
Rnd 4: sc even (18); F/O and leave a long strand of yarn.
Embroider the NOSE and the vertical line with black cotton thread.
Sew the muzzle to the body between rnds # 7-12. Stuff it while you sew it to the body.
Embroider the EYEBROWS between rounds # 4-7, 7 stitches apart, with black cotton thread
.
ANTLERS (brown yarn; make two; 2.25 mm hook)
Tine #1
Rnd 1: 6 sc in a mr (6)
Rnd 2 - 4: sc even (6); F/O and cut the yarn. Do not stuff the tine.
Tine #2
Rnd 1: 6 sc in a mr (6)
Rnd 2 - 3: sc even (6); F/O and cut the yarn. Do not stuff the tine.
Tine #3
Rnd 1: 6 sc in a mr (6)
Rnd 2 - 5: sc even (6); F/O and cut the yarn. Do not stuff the tine.
Main Horn
Rnd 1: 6 sc in a mr (6)
Rnd 2 - 5: sc even (6)
Rnd 6: 3 sc, keep working on tine #1, (1 sc, 2 sc dec, 1 sc),
go back working on the main part, 3 sc (10)
Rnd 7: 2 sc, 3 sc dec, 2 sc (7)
Rnd 8: keep working on tine #2, (1 sc, 2 sc dec, 1 sc), go back working on the main part, 2 sc, 1 dec, 3 sc (10)
Rnd 9: 3 sc dec, 4 sc (7)
Rnd 10: 4 sc, keep working on tine #3, (1 sc, 2 sc dec, 1 sc), go back working on the main part, 3 sc (11)
Rnd 11: 3 sc, 4 sc dec (7)
Rnd 12: 1 sc dec, 5 sc (6)
Rnd 13: 6 sc (6); F/O and leave a long strand of yarn.
Do not stuff the antlers. Sew them on the top of the head, between rounds # 2-5.
EARS (beige yarn; make two; 2.75 mm hook)
Rnd 1: 8 sc in a mr (8)
Rnd 2: (1 sc, 1 sc inc) rep around (12)
Rnd 3 - 4: sc even (12)
Rnd 5: (4 sc, 1 sc dec) rep twice (10)
Rnd 6: (3 sc, 1 sc dec) rep twice (8)
Rnd 7: (2 sc, 1 sc dec) rep twice (6); F/O and leave a long strand of yarn.
Embroider the 3 lines on the inner part of the ear with brown yarn.
Do not stuff the ears, flatten them instead before sewing them on the top of the head, between rounds # 6-9.
LEGS (red and beige yarn; make two; 2.75 mm hook)
Rnd 1: starting off with red yarn, 8 sc in a mr (8)
Rnd 2: (3 sc, 1 sc inc) rep twice (10)
Rnd 3 - 6: sc even (10)
Rnd 7: switch to beige yarn, sc even (10)
Rnd 8: sc even (10); F/O and leave a long tail of yarn to sew the legs to the bottom part of the body, between rnds #35-38. Stuff the legs before sewing them on.
ARMS (beige yarn; make two; 2.75 mm hook)
Rnd 1: 10 sc in a mr (10)
Rnd 2 - 3: sc even (10)
Rnd 4: (3 sc, 1 sc dec) rep twice (8)
Rnd 5: sc even (8)
Rnd 6: (2 sc, 1 sc dec) rep twice (6)
Rnd 7 - 9: sc even (6); F/O and leave a long tail.
Do not stuff the arms, sew them to the side of the body, between rounds # 19-21.
TAIL (beige yarn; 2.75 mm hook)
Rnd 1: 5 ch, 1 sc in the 2nd ch from the hook, 3 sc (4); F/O and leave a long strand of yarn to sew the tail to the back part of the body, between rnds # 27-28.
SCARF (sea green yarn; 4 mm Tunisian hook)
1. Chain 5
2. Insert your hook into the 2nd ch from your hook, yarn over (wrap the yarn over your hook) and pull the strand of yarn through the first loop on your hook. (This adds one loop onto your hook)
3. Insert your hook into the next chain, yarn over (wrap the yarn over your hook) and pull the strand of yarn through the first loop on your hook. (This adds one loop onto your hook)
Repeat steps 3 for each chain across. When you are done you should have 5 loops on your hook.
Now let’s finish this row of Tunisian simple stitches by working in the other direction.
4. Yarn over (wrap yarn over your hook), pull the strand of yarn through the first loop on your hook. (There should still be 5 loops on your hook)
5. Yarn over (wrap yarn over your hook), pull the strand of yarn through the next 2 loops on your hook. (There should now be 1 less loop on your hook)
Repeat steps 5 until there is only 1 loop left on your hook.
6. Insert your hook between the 2 vertical bars of the 2nd st. Yarn over (wrap yarn over your hook)
Pull the strand of yarn through the first loop on your hook (This adds one loop onto your hook).
Do the same for each stitch across. When you are done you should have 5 loops on your hook.
Rep 3-6 until you reach a total of 90 rows. Once you have completed the last row, ch1, turn and then work one extra row of sc stitches, F/O and leave a long strand of yarn to sew the first and the last rows together.
Wrap the infinity scarf around the body.
I can't wait to see your version of my THEO THE REINDEER! Feel free to tag me (@elisascrochet) in your photos on Instagram or Facebook if you'd like!
Elisa
This pattern is an original pattern by Elisa Sartori of Elisa's Crochet. Please do not claim this pattern as your own. If you wish to share this pattern, you may link to this pattern but please do not reprint it on your site. You may keep a copy for your own personal use but please DO NOT sell the pattern or distribute it.
You may sell products made from this pattern but please clearly credit the design to me, Elisa Sartori of Elisa's Crochet. Permission is NOT granted for mass production or factory manufacturing of any kind. Thank you!


