
Holly the Hammerhead Shark Free Crochet Pattern
- Elisa
- Jan 16, 2024
- 9 min read
Updated: Jun 19, 2024

Happy Tuesday my friends!
Let's dive in into the fin-tastic world of amigurumi hammerhead sharks with this super fun and easy project!
I absolutely loved designing Holly the Shark and I'm confident you'll feel the same once you'll start working on it too!
Holly has a great huggable size, its soft and warm and takes very little time to make...what to like more about this project??
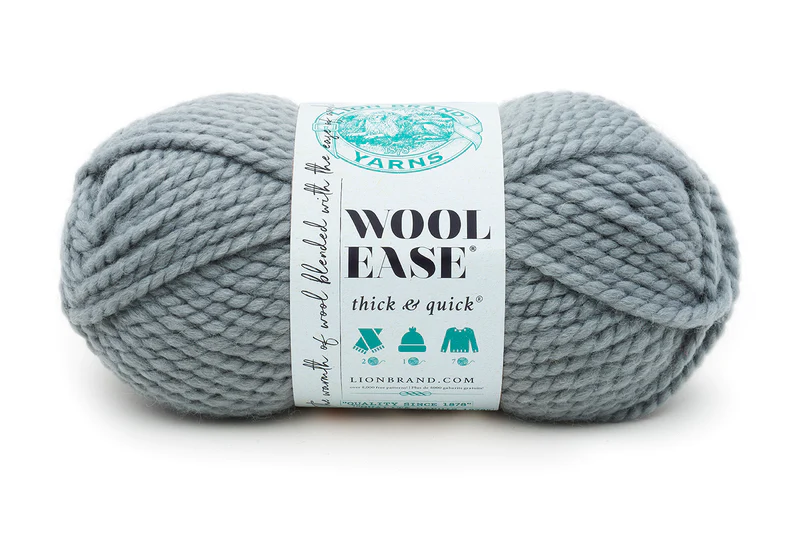
Holly the Hammerhead Shark is worked with Wool Ease Thick & Quick by Lion Brand - soft and warm wool, available in a wide variety of colors!

***You can purchase a downloadable AD-FREE PDF of the pattern: 10 pages with more than
40 step-by-step pictures,
schematic and tips to guide you through the making process
Here is the FREE pattern
EASY
SIZE
About 16 in. (40.5 cm) long
MATERIALS
· Lion Brand® WOOL EASE THICK & QUICK® (Art. #640)
#148P Slate 2 balls (A)
· Lion Brand® large-eyed blunt needle
ADDITIONAL MATERIALS
Crochet hook size 7 mm
Fiberfill Stuffing
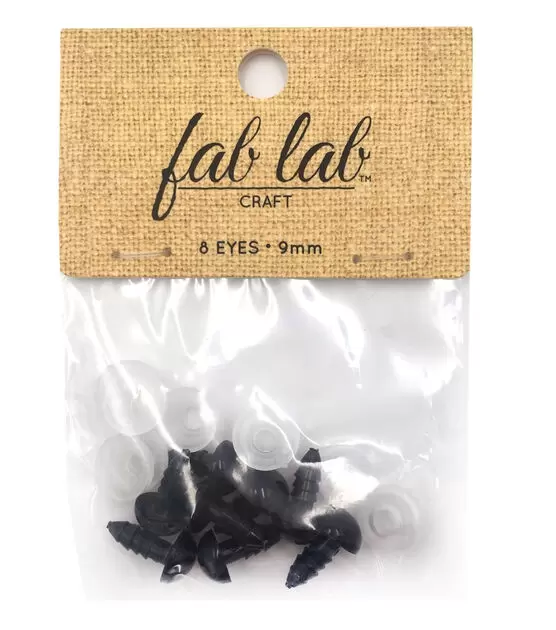
Black Plastic Safety Eyes (10 mm)
Black and White Embroidery Floss
GAUGE
10 sc + 10 rnds = about 4 in. (10 cm).
ABBREVIATIONS
ch = chain
ch-sp(s) = chain space(s) previously made
rem = remain(ing)
rep = repeat
rnd(s) = round(s)
RS = right side
WS = wrong side
sc = single crochet
sl st = slip stitch
st(s) = stitch(es)


Disclosure. Most blog posts on this website contain affiliate links. This means I get a small commission if you click-through & purchase (no additional cost to you).
Head & Body
Head
With A, make a magic ring.
Rnd 1: Work 6 sc in ring; invisible join with sl st in first sc.
Rnd 2: Ch 1, 2 sc in each st around (complete the last st switching to B) – 12 sc; invisible join with sl st in first sc.
Rnd 3: Ch 1, * 1 sc in next st, 2 sc in next st; rep from * around – 18 sc; invisible join with sl st in first sc.
Rnd 4: Ch 1, work in back loop, sc in each st around – 18 sc; invisible join with sl st in first sc.
Rnd 5 - 7: Ch 1, sc in each st around – 18 sc; invisible join with sl st in first sc.
Row 8: Ch 1, sc in each st around – 18 sc; do not join; Turn.
Rows 9 - 14: Ch 1, sc in each st around – 18 sc; do not join; Turn.
Rnds 15 - 18: Ch 1, sc in each st around – 18 sc; invisible join with sl st in first sc.
Rnd 19: Ch 1, work in back loop, sc in each st around – 18 sc; invisible join with sl st in first sc.
Rnd 20: Ch 1, * 1 sc in next st, sc2tog; rep from * around – 12 sc; invisible join with sl st in first sc.
Fasten off, leaving a long tail. Thread tail through top of sts of last rnd. Pull tail to close opening and knot securely.
Insert plastic safety eyes on sides of Head between Rnds 1 and 2.
Begin stuffing piece and continue stuffing until piece is complete.
Body
Crochet in the open hole in the head. Start on the right side, insert hook into 1st st of Rnd 8.
Rnd 21: Ch 1, sc into same st, sc in next 5 st, 1 sc in next two side sts; keep working on the opposite side, sc in next 6 sts, sc in next 2 side sts – 16 sc; invisible join with sl st in first sc.
Rnd 22: Ch 1, * 1 sc in next 3 sts, 2 sc in next st; rep from * around – 20 sc; invisible join with sl st in first sc.
Rnd 23: Ch 1, * 1 sc in next 4 sts, 2 sc in next st; rep from * around – 24 sc; invisible join with sl st in first sc.
Rnd 24: Ch 1, * 1 sc in next 5 sts, 2 sc in next st; rep from * around – 28 sc; invisible join with sl st in first sc.
Rnd 25: Ch 1, sc in each st around – 28 sc; invisible join with sl st in first sc.
Rnd 26: Ch 1, * 1 sc in next 6 sts, 2 sc in next st; rep from * around – 32 sc; invisible join with sl st in first sc.
Rnd 27: Ch 1, * 1 sc in next 7 sts, 2 sc in next st; rep from * around – 36 sc; invisible join with sl st in first sc.
Rnds 28 - 30: Ch 1, sc in each st around – 36 sc; invisible join with sl st in first sc.
Rnd 31: Ch 1, * 1 sc in next 7 sts, sc2tog; rep from * around – 32 sc; invisible join with sl st in first sc.
Rnds 32 - 33: Ch 1, sc in each st around – 32 sc; invisible join with sl st in first sc.
Rnd 34: Ch 1, 1 sc in next 6 sts, sc2tog; rep from around – 28 sc; invisible join with sl st in first sc.
Rnds 35 - 36: Ch 1, sc in each st around – 28 sc; invisible join with sl st in first sc.
Rnd 37: Ch 1, * 1 sc in next 5 sts, sc2tog; rep from * around – 24 sc; invisible join with sl st in first sc.
Rnd 38: Ch 1, sc in each st around – 24 sc; invisible join with sl st in first sc.
Rnd 39: Ch 1, * 1 sc in next 4 sts, sc2tog; rep from * around – 20 sc; invisible join with sl st in first sc.
Rnd 40: Ch 1, sc in each st around – 20 sc; invisible join with sl st in first sc.
Rnd 41: Ch 1, sc in next 8 sts, sc2tog twice, sc in next 8 sts – 18 sc; invisible join with sl st in first sc.
Rnd 42: Ch 1, 2 sc in next st, sc in next 6 sts, sc2tog twice, sc in next 6 sts, 2 sc in next st – 18 sc; invisible join with sl st in first sc.
Rnd 43: Rep Rnd 42.
Rnd 44: Ch 1, sc in next 7 sts, sc2tog twice, sc in next 7 sts – 16 sc; invisible join with sl st in first sc.
Rnd 45: Ch 1, 2 sc in next st, sc in next 5 sts, sc2tog twice, sc in next 5 sts, 2 sc in next st – 16 sc; invisible join with sl st in first sc.
Rnd 46: Ch 1, sc in next 6 sts, sc2tog twice, sc in next 6 sts – 14 sc; invisible join with sl st in first sc.
Rnd 47: Ch 1, sc in next 5 sts, sc2tog twice, sc in next 5 sts – 12 sc; invisible join with sl st in first sc.
Rnd 48: Ch 1, sc in next 4 sts, sc2tog twice, sc in next 4 sts – 10 sc; invisible join with sl st in first sc.
Rnd 49: Ch 1, * sc in next 3 sts, sc2tog; rep from * twice – 8 sc; invisible join with sl st in first sc.
Rnds 50 - 51: Ch 1, sc in each st around – 8 sc; invisible join with sl st in first sc.
Rnd 52: Ch 1, * sc in next 2 sts, sc2tog; rep from * twice – 6 sc; invisible join with sl st in first sc.
Finish stuffing piece.
Rnds 53 - 54: Ch 1, sc in each st around –6 sc; invisible join with sl st in first sc.
Fasten off, leaving a long tail. Thread tail through top of sts of last rnd. Pull tail to close opening and knot securely.
With white floss, embroider curves along outer edges of safety eyes for whites of eyes.
With black floss, embroider curves along upper edges of safety eyes for black of eyes.
With black floss, embroider Mouth.
Dorsal Fin
With A, make a magic ring.
Rnd 1: Work 4 sc in ring; invisible join with sl st in first sc.
Rnd 2: Ch 1, sc in next 3 sts, 2 sc in next st – 5 sc; invisible join with sl st in first sc.
Rnd 3: Ch 1, sc in next 4 sts, 2 sc in next st – 6 sc; invisible join with sl st in first sc.
Rnd 4: Ch 1, sc in next 5 sts, 2 sc in next st – 7 sc; invisible join with sl st in first sc.
Rnd 5: Ch 1, sc in next 6 sts, 2 sc in next st – 8 sc; invisible join with sl st in first sc.
Rnd 6: Ch 1, 2 sc in next st, sc in next 6 sts, 2 sc in next st – 10 sc; invisible join with sl st in first sc.
Rnd 7: Ch 1, 2 sc in next st, sc in next 8 sts, 2 sc in next st – 12 sc; invisible join with sl st in first sc.
Rnd 8: Ch 1, sc in next 5 sts, 2 sc in next 2 sts, sc in next 5 sts – 14 sc; invisible join with sl st in first sc.
Fasten off leaving a long tail. With A, sew Dorsal Fin to Body between Rnds 29 and 36.
Pectoral Fins (make two)
With A, make a magic ring.
Rnd 1: Work 4 sc in ring; invisible join with sl st in first sc.
Rnd 2: Ch 1, sc in next 3 sts, 2 sc in next st – 5 sc; invisible join with sl st in first sc.
Rnd 3: Ch 1, sc in next 4 sts, 2 sc in next st – 6 sc; invisible join with sl st in first sc.
Rnd 4: Ch 1, sc in next 5 sts, 2 sc in next st – 7 sc; invisible join with sl st in first sc.
Rnd 5: Ch 1, sc in next 6 sts, 2 sc in next st – 8 sc; invisible join with sl st in first sc.
Rnd 6: Ch 1, 2 sc in next st, sc in next 6 sts, 2 sc in next st – 10 sc; invisible join with sl st in first sc.
Rnd 7: Ch 1, 2 sc in next st, sc in next 8 sts, 2 sc in next st – 12 sc; invisible join with sl st in first sc.
Rnd 8: Ch 1, sc in next 5 sts, 2 sc in next 2 sts, sc in next 5 sts – 14 sc; invisible join with sl st in first sc.
Rnd 9: Ch 1, 2 sc in next st, sc in next 12 sts, 2 sc in next st – 16 sc; invisible join with sl st in first sc.
Fasten off leaving a long tail. With A, sew Pectoral Fins to sides of Body between Rnds 28 and 37.
Lower Caudal Fin
With A, make a magic ring.
Rnd 1: Work 4 sc in ring; invisible join with sl st in first sc.
Rnd 2: Ch 1, sc in next 3 sts, 2 sc in next st – 5 sc; invisible join with sl st in first sc.
Rnd 3: Ch 1, sc in next 4 sts, 2 sc in next st – 6 sc; invisible join with sl st in first sc.
Rnd 4: Ch 1, sc in next 5 sts, 2 sc in next st – 7 sc; invisible join with sl st in first sc.
Rnd 5: Ch 1, sc in next 6 sts, 2 sc in next st – 8 sc; invisible join with sl st in first sc.
Rnd 6 Ch 1, 2 sc in next st, sc in next 6 sts, 2 sc in next st – 10 sc; invisible join with sl st in first sc.
Fasten off leaving a long tail.
Upper Caudal Fin
With A, make a magic ring.
Rnd 1: Work 4 sc in ring; invisible join with sl st in first sc.
Rnd 2: Ch 1, sc in next 3 sts, 2 sc in next st – 5 sc; invisible join with sl st in first sc.
Rnd 3: Ch 1, sc in next 4 sts, 2 sc in next st – 6 sc; invisible join with sl st in first sc.
Rnd 4: Ch 1, sc in next 5 sts, 2 sc in next st – 7 sc; invisible join with sl st in first sc.
Rnd 5: Ch 1, sc in next 6 sts, 2 sc in next st – 8 sc; invisible join with sl st in first sc.
Rnd 6 Ch 1, 2 sc in next st, sc in next 6 sts, 2 sc in next st – 10 sc; invisible join with sl st in first sc.
Rnd 7: Ch 1, 2 sc in next st, sc in next 8 sts, 2 sc in next st – 12 sc; invisible join with sl st in first sc.
Rnd 8: Ch 1, 2 sc in next st, sc in next 3 sts, sc2tog twice, sc in next 3 sts, 2 sc in next st – 12 sc; invisible join with sl st in first sc.
Fasten off leaving a long tail.
With A, sew Upper and Lower Caudal Fins to end of Tail.


I can't wait to see your version of HOLLY THE HAMMERHEAD SHARK! Feel free to tag me (@elisascrochet) in your photos on Instagram or Facebook!
Elisa
This pattern is an original pattern by Elisa Sartori of Elisa's Crochet. Please do not claim this pattern as your own. If you wish to share this pattern, you may link to this pattern but please do not reprint it on your site. You may keep a copy for your own personal use but please DO NOT sell the pattern or distribute it.
You may sell products made from this pattern but please clearly credit the design to me, Elisa Sartori of Elisa's Crochet. Permission is NOT granted for mass production or factory manufacturing of any kind. Thank you!