
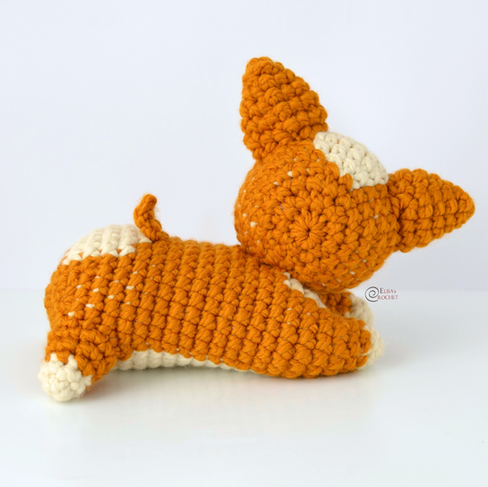
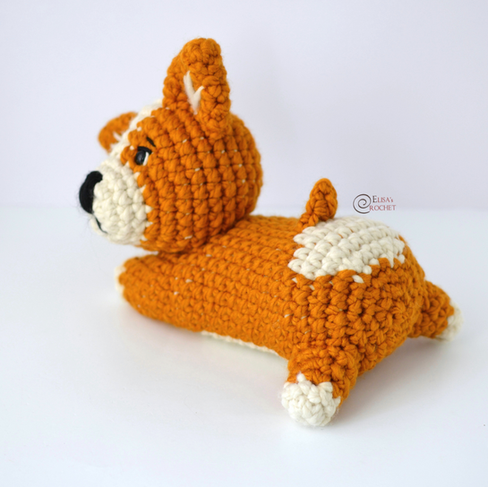
Milo the Baby Corgi Free Crochet Pattern
- Elisa
- Jan 2, 2024
- 8 min read

Happy New Year!!!
May your coming year be filled with a lot of yarn and great crochet projects!
I loved sharing my passion for crochet with you all in 2023 and I'm thrilled to start the New Year with new inspirations and ideas.
I know I'm late on this trend - Corgis have been so popular over the past few years - but I've finally designed and create a super easy pattern to create the sweetest little puppy to share with you all!
I hope you'll enjoy and love this project as much as I do!!!

***You can purchase a downloadable AD-FREE PDF of the pattern: 13 pages with more than
70 step-by-step pictures,
schematic and tips to guide you through the making process
Here is the FREE pattern
EASY
SIZE
About 7 ½ in. (19 cm) tall, 10 ½ in. (26.5) long.
MATERIALS
• LION BRAND® WOOL EASE THICK & QUICK® (Art. #640)
#099 Fisherman 1 ball (A)
#189A Butterscotch1 ball (B)
#153 Black 1 ball (C)
• LION BRAND® large-eyed blunt needle
ADDITIONAL MATERIALS
Crochet hook size 7 mm
Fiberfill Stuffing
Black Plastic Safety Eyes (10 mm)
Black and White Embroidery Floss
GAUGE
10 sc + 10 rnds = about 4 in. (10 cm).


Disclosure. Most blog posts on this website contain affiliate links. This means I get a small commission if you click-through & purchase (no additional cost to you).
Front, Legs and Body
Leg I
With A, make a magic ring.
Rnd 1: Work 6 sc in ring; invisible join with sl st in first sc.
Rnd 2: Ch 1, 1 sc in each st around (complete the last st switching to B) – 6 sc; invisible join with sl st in first sc.
Rnd 3: Ch 1, 1 sc in next 2 sts, 2 sc in next st; rep from twice – 8 sc; invisible join with sl st in first sc.
Rnd 4: Ch 1, 1 sc in next 3 sts, 2 sc in next st; rep from twice – 10 sc; invisible join with sl st in first sc.
Fasten off.
Leg II
With A, make a magic ring.
Rnd 1: Work 6 sc in ring; invisible join with sl st in first sc.
Rnd 2: Ch 1, 1 sc in each st around (complete the last st switching to B) – 6 sc; invisible join with sl st in first sc.
Rnd 3: Ch 1, * 1 sc in next 2 sts, 2 sc in next st; rep from twice – 8 sc; invisible join with sl st in first sc.
Rnd 4: Ch 1, * 1 sc in next 3 sts, 2 sc in next st; rep from twice (complete the last st switching to A) – 10 sc; invisible join with sl st in first sc.
Do not fasten off.
Join Legs
Rnd 5: Ch 3 (for space between legs), insert hook in 1st st of last Rnd of Leg I and draw up a loop of B, ch 1, sc in same st, sc in next 9 sts; with A, working in
back bumps of chains between legs, hdc in next 3 chs; with B, working in sts of Leg II, sc in first st following chain between legs, sc in next 9 sts; with A, working in back bumps of chains between legs, hdc in next 3 chs; invisible join with sl st in first sc – 26 sts.
Do not fasten off.
Body
Rnd 6: Ch 1, 2 sc in first st; with B, 1 sc in next 8 sts; with A, 2 sc in next st, 1 sc in next 3 sts, 2 sc in next st; with B, 1 sc in next 8 sts; with A, 2 sc in next st, 1 sc in next 3 sts; invisible join with sl st in first sc – 30 sc.
Rnd 7: Ch 1, 1 sc in next 3 sts; with B, 1 sc in next 7 sts; with A, 1 sc in next 7 sts; with B, 1 sc in next 8 sts; with A, 1 sc in next 5 sts; invisible join with sl st in first sc – 30 sc.
Rnd 8: rep Rnd 7.
Rnd 9: Ch 1, 1 sc in next 3 sts; with B, 1 sc in next 22 sts; with A, 1 sc in next 5 sts; invisible join with sl st in first sc – 30 sc.
Rnd 10: Ch 1, 1 sc in next 4 sts; with B, 1 sc in next 21 sts; with A, 1 sc in next 5 sts; invisible join with sl st in first sc – 30 sc.
Rnds 11 - 16: rep Rnd 10.
Begin stuffing piece and continue stuffing until piece is complete.
Rnd 17: Ch 1, 1 sc in next 4 sts; with B, 2 sc in next st, 1 sc in next 9 sts, 2 sc in next st, 1 sc in next 9 sts, 2 sc in next st; with A, 1 sc in next 5 sts; invisible join with sl st in first sc – 33 sc.
Rnd 18: Ch 1, 1 sc in next 3 sts; with B, 1 sc in next 11 sts; with A, 1 sc in next 5 sts; with B, 1 sc in next 10 sts; with A, 1 sc in next 4 sts; invisible join with sl st in first sc – 33 sc.
Rnd 19: Ch 1, 1 sc in next 2 sts; with B, 1 sc in next 10 sts; with A, 1 sc in next 9 sts; with B, 1 sc in next 9 sts; with A, 1 sc in next 3 sts (complete the last st switching to B); invisible join with sl st in first sc – 33 sc.
Rnd 20: Ch 1, 1 sc in next 12 sts; with A, 1 sc in next 9 sts; with B, 1 sc in next 12 sts; invisible join with sl st in first sc – 33 sc.
Rnd 21: Ch 1, 1 sc in next 10 sts, sc2tog, sc in next st; with A, 1 sc in next 8 sts; with B, sc2tog, 1 sc in next 8 sts, sc2tog; invisible join with sl st in first sc – 30 sc.
Rnd 22: Ch 1, 1 sc in next 3 sts, sc2tog; rep from twice, sc in next 3 sts; with A, sc2tog, 1 sc in next 3 sts, sc2tog; with B, 1 sc in next 3 sts, sc2tog; rep from twice; invisible join with sl st in first sc – 24 sc.
Rnd 23: Ch 1, 1 sc in next 2 sts, sc2tog; rep from around; invisible join with sl st in first sc – 18 sc.
Rnd 24: Ch 1, 1 sc in next st, sc2tog; rep from around; invisible join with sl st in first sc – 12 sc.
Finish stuffing piece.
Rnd 25: Ch 1, sc2tog around; invisible join with sl st in first sc – 6 sc.
Fasten off, leaving a long tail. Thread tail through top of sts of last rnd. Pull tail to close opening and knot securely.
Head
With A, make a magic ring.
Rnd 1: Work 8 sc in ring; invisible join with sl st in first sc.
Rnd 2: Ch 1, 2 sc in each st around – 16 sc; invisible join with sl st in first sc.
Rnd 3: Ch 1, 1 sc in each st around – 16 sc; invisible join with sl st in first sc.
Rnd 4: Ch 1, 1 sc in each st around (complete the last st switching to B) – 16 sc; invisible join with sl st in first sc.
Rnd 5: Ch 1, 1 sc in next st, 2 sc in next st; rep from three times, sc in next st; with A, 2 sc in next 2 sts; with B, 1 sc in next st, 2 sc in next st; rep from three times, sc in next st – 24 sc; invisible join with sl st in first sc.
Rnd 6: Ch 1, 1 sc in next 2 sts, 2 sc in next st; rep from three times, sc in next 2 sts; with A, 1 sc in next 3 sts; with B, 1 sc in next 2 sts, 2 sc in next st; rep from three times, sc in next st – 30 sc; invisible join with sl st in first sc.
Rnd 7: Ch 1, 1 sc in next 14 sts; with A, 1 sc in next st, 2 sc in next st, 1 sc in next st; with B, 1 sc in next 13 sts – 31 sc; invisible join with sl st in first sc.
Rnd 8: Ch 1, 1 sc in next 14 sts; with A, 2 sc in next st, sc in next 2 sts, 2 sc in next st; with B, 1 sc in next 13 sts – 33 sc; invisible join with sl st in first sc.
Rnd 9: Ch 1, sc2tog, 1 sc in next 12 sts; with A, sc in next 7 sts; with B, 1 sc in next 12 sts – 32 sc; invisible join with sl st in first sc.
Rnd 10: Ch 1, 1 sc in next 13 sts; with A, sc in next 7 sts; with B, 1 sc in next 12 sts – 32 sc; invisible join with sl st in first sc.
Insert plastic safety eyes on front of Head between Rnds 5 and 6, about 7 sts apart.
Rnd 11: Ch 1, 1 sc in next 13 sts; with A, sc2tog, sc in next 3 sts, sc2tog; with B, 1 sc in next 12 sts – 30 sc; invisible join with sl st in first sc.
Rnd 12: Ch 1, sc in next 4 sts, sc2tog; rep from twice, sc in next 2 sts; with A, sc in next 2 sts, sc2tog; with B, sc in next 4 sts, sc2tog; rep from * twice – 25 sc; invisible join with sl st in first sc.
Rnd 13: Ch 1, sc in next 3 sts, sc2tog; rep from around – 20 sc; invisible join with sl st in first sc.
Rnd 14: Ch 1, sc in next 2 sts, sc2tog; rep from around – 15 sc; invisible join with sl st in first sc.
Finish stuffing piece.
Rnd 15: Ch 1, sc in next st, sc2tog; rep from around – 10 sc; invisible join with sl st in first sc.
Fasten off, leaving a long tail. Thread tail through top of sts of last rnd. Pull tail to close opening and knot securely.
With white floss, embroider curves along outer edges of safety eyes for whites of eyes.
With black floss, embroider curves along upper edges of safety eyes for black of eyes.
With black floss, embroider straight stitch eyebrows on face, above Eyes.
With C, embroider Nose, between Rnds 1 and 3.
Ears (make two)
With B, make a magic ring.
Rnd 1: Work 5 sc in ring; invisible join with sl st in first sc.
Rnd 2: Ch 1, 2 sc in 1st st, sc in next 4 sts – 6 sc; invisible join with sl st in first sc.
Rnd 3: Ch 1, 1 sc in next 2 sts, 2 sc in next st; rep from twice – 8 sc; invisible join with sl st in first sc.
Rnd 4: Ch 1, 1 sc in next 3 sts, 2 sc in next st; rep from twice – 10 sc; invisible join with sl st in first sc.
Rnd 5: Ch 1, 1 sc in next 4 sts, 2 sc in next st; rep from twice – 12 sc; invisible join with sl st in first sc.
Rnd 6: Ch 1, sc in each st around – 12 sc; invisible join with sl st in first sc.
Fasten off, leaving a long tail.
With A, embroider straight lines on Ears.
With B, sew Ears on top of Head between Rnds 8 and 10, about 7 sts apart.
Back Legs (make two)
With A, make a magic ring.
Rnd 1: Work 6 sc in ring; invisible join with sl st in first sc.
Rnd 2: Ch 1, 1 sc in each st around (complete the last st switching to B) – 6 sc; invisible join with sl st in first sc.
Rnd 3: Ch 1, 1 sc in next 2 sts, 2 sc in next st; rep from twice – 8 sc; invisible join with sl st in first sc.
Rnd 4: Ch 1, 1 sc in next 3 sts, 2 sc in next st; rep from twice – 10 sc; invisible join with sl st in first sc.
Rnd 5: Ch 1, 1 sc in next 4 sts, 2 sc in next st; rep from twice – 12 sc; invisible join with sl st in first sc.
Fasten off, leaving a long tail. Stuff the Legs.
With B, sew Back Legs to Body, between Rnds 18 and 23.
Tail
With B
Rnd 1: Ch 4; sl st in 2nd ch from the hook, hdc in next st, dc in next st – 3 sts
Fasten off, leaving a long tail. With B sew Tail to Body, between Rnds 16 and 17.
With B, sew Head to Body.


I can't wait to see your version of MILO THE BABY CORGI! Feel free to tag me (@elisascrochet) in your photos on Instagram or Facebook!
Elisa
This pattern is an original pattern by Elisa Sartori of Elisa's Crochet. Please do not claim this pattern as your own. If you wish to share this pattern, you may link to this pattern but please do not reprint it on your site. You may keep a copy for your own personal use but please DO NOT sell the pattern or distribute it.
You may sell products made from this pattern but please clearly credit the design to me, Elisa Sartori of Elisa's Crochet. Permission is NOT granted for mass production or factory manufacturing of any kind. Thank you!