
Spring Wall Hanging Free Crochet Pattern
- Elisa
- Feb 22, 2022
- 4 min read
Happy Tuesday and welcome back to my page!
Who's ready to start working on a fresh and colorful project?
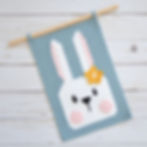
Let's get ready to welcome the Spring season with a fun wall/door hanging.
Everything about this crocheted panel screams spring, from the pastel colors to the cute bunny face.
The panel is worked with the tapestry technique that allows you to work with 2 or more colors at the time, carrying the non-worked color inside the stitches.
If you are new to the tapestry technique, here's a helpful tutorial for you to check:
Well, then grab your favorite yarn and hook and crochet along with me!
___________________________________________________________________________________________
Find the downloadable PDF pattern listed on my Etsy page - you will find in it many explanatory step-by-step pictures, charts and schematics to guide you through the making process!
___________________________________________________________________________________________

Here's the FREE pattern!
YARN: Light (3) in Blue, White, Pink, Yellow and Black
MATERIALS: 2.5 mm Hook; Yarn Needle; Wooden Dowel (width 3/8”)
DIMENSION: 7” x 10.5” (17 x 27 cm)
ABBREVIATIONS: chain (ch), stitch (st), slip stitch (sl st), single crochet (sc),
double crochet (dc), treble crochet (tr),
fasten off (F/O)
SKILL LEVEL: Intermediate
___________________________________________________________________________________________


Disclosure. Most blog posts on this website contain affiliate links. This means I get a small commission if you click-through & purchase (no additional cost to you).
___________________________________________________________________________________________

TECHNIQUES REQUIRED
SEAMLESS COLOR CHANGE
Work in the previous color until two loops of the last stitch remain on the hook. Use the new color to complete the stitch, then continue working with the new color as before.
TAPESTRY CROCHET
Color-changing technique that allows you to work a single row of stitches in more than one color; it is worked very tightly with the non-working color carried inside the stitch.
Here below a link where you can find a helpful tutorial for working both techniques:
Start your crocheted panel by working 47 chains, work 1 sc into the 2nd ch from the hook, then keep working 1 sc in each ch across. Once you have completed the 1st row, chain 1 and turn.
Remember to always ch1 and turn at the end of each row.
At row #6 you will start creating the bunny pattern by incorporating the second color.
Work with blue yarn until two loops of the last stitch remain on the hook.
Use the white yarn to complete the stitch, then continue working with the new color as before.
Always remember to carry the additional yarn along with you and work over it as you crochet the row.
Do the same when working the nose and the pink section of the ears.
In this case you would carry two additional yarn strands (blue and white) while working the new colors.
Now it’s time to work on the additional parts that will be then sewn or embroidered on the crocheted panel.

Cheeks (pink yarn; make two)
Rnd 1: 6 sc in a mr (6)
Rnd 2: sc inc around (12)
Rnd 3: (1 sc, 1 sc inc) (18)
Rnd 4: (2 sc, 1 sc inc) (24); F/O and leave a long strand of yarn to sew the cheeks to the crocheted panel between rows #10-16.
Embroider the eyes with a long strand of black yarn between rows #19-25 (2 sts wide).
Use a scrap piece of black yarn to embroider a horizontal line on the eye, to create the eye glare.
Use a scrap piece of black yarn to embroider a vertical line below the nose between rows #13-17.
Flower (white and yellow yarn)
Rnd 1: starting with white yarn, 10 sc in a mr (10)
Rnd 2: switch to yellow yarn, 2 ch, [(1 dc, 2 tr into the 1st st, 2 ch, work a sl st into the tip of the last worked tr stitch), (2 tr, 2 ch, 1 sl st into the next st)] rep 5 times; F/O and leave a long strand of yellow yarn to sew the flower to the crocheted panel between rows #31-32.
Let’s create now two blue crocheted STRIPES to insert the wooden dowel into.
Right stripe:
Row 1: insert your hook into the 1st st of the last row, work 1 sc into the same st and 1 sc into the next one (2); ch 1 and turn
Row 2: 2 sc (2); ch 1 and turn
Row 3 -10: rep row 2 (2); F/O and leave a strand of yarn to sew the last row to the opposite side of the panel to create the space for the dowel.
Left stripe:
Row 1: insert your hook into the second-last st of the last row, work 1 sc into the same st and 1 sc into the next one (2); ch 1 and turn
Row 2: 2 sc (2); ch 1 and turn
Row 3 -10: rep row 2 (2); F/O and leave a strand of yarn to sew the last row to the opposite side of the panel to create the space for the dowel.

I can't wait to see your version of my SPRING WALL HANGING! Feel free to tag me (@elisascrochet) in your photos on Instagram or Facebook if you'd like!
Elisa
This pattern is an original pattern by Elisa Sartori of Elisa's Crochet. Please do not claim this pattern as your own. If you wish to share this pattern, you may link to this pattern but please do not reprint it on your site. You may keep a copy for your own personal use but please DO NOT sell the pattern or distribute it.
You may sell products made from this pattern but please clearly credit the design to me, Elisa Sartori of Elisa's Crochet. Permission is NOT granted for mass production or factory manufacturing of any kind. Thank you!