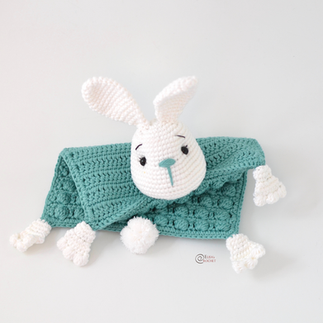
Bunny Security Blanket Free Crochet Pattern
- Elisa
- Mar 22, 2022
- 4 min read

Updated: Apr 20, 2022

Happy Tuesday and welcome back to my blog!
Today I'm gonna share with you all a new mini safety blanket design!
My Sheep and Sloth versions are still going strong, so I decided to work a new version that I hope you'll love as much as you liked the first ones.
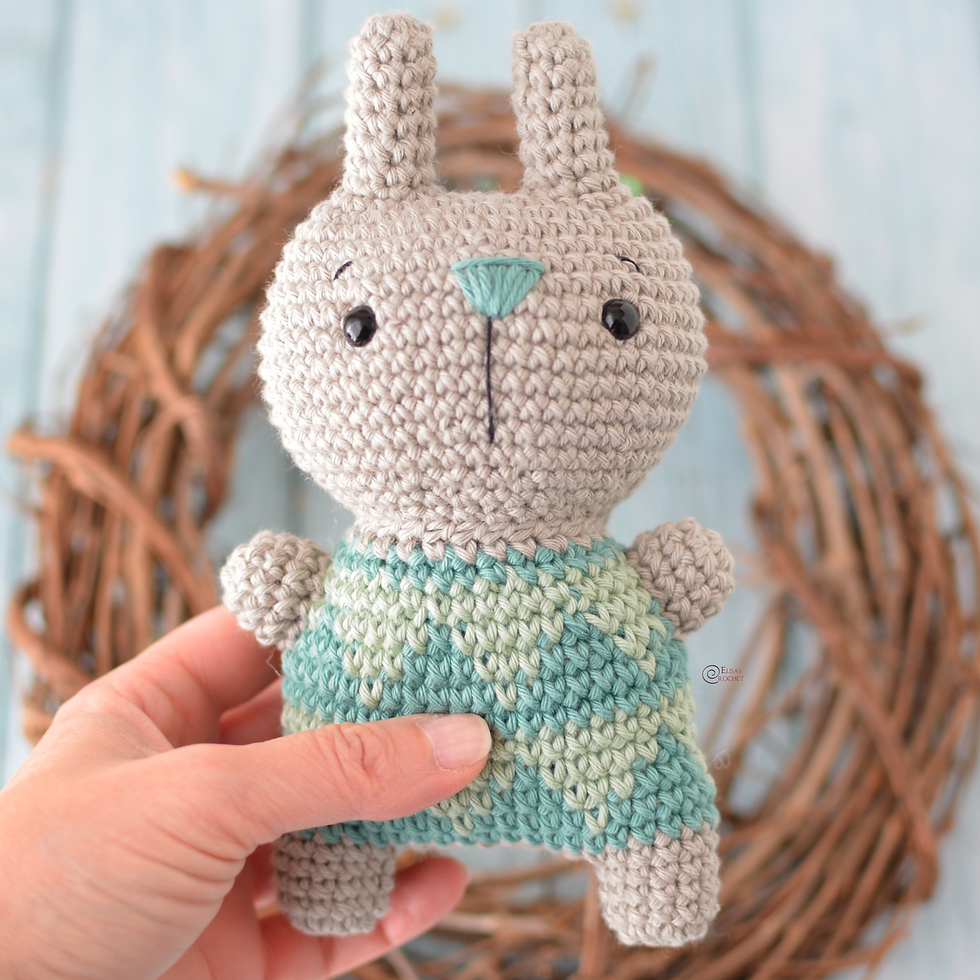
A cute little bunny is the new addition to the series...just in time for the Spring season, right?
_________________________________________________________________________________
***You can purchase a downloadable AD-FREE PDF of the pattern with 40 step-by-step pictures and charts on Etsy HERE.

Here's the FREE pattern!
YARN: Light (3) - White and Turquoise; Cotton Thread in Black
MATERIALS: 3.25 mm Crochet Hook; Poly Filling; 9 mm Plastic Safety Eyes
DIMENSION: 12” x 9”
ABBREVIATIONS: magic ring (mr), stitch (st), slip stitch (sl st), single crochet (sc), double crochet (dc), bobble stitch (bo), fasten off (F/O)
SKILL LEVEL: Intermediate


Disclosure. Most blog posts on this website contain affiliate links. This means I get a small commission if you click-through & purchase (no additional cost to you).
BLANKET PANEL A (turquoise yarn; work in rows)
Row 1: 38 ch, 1 sc into the 2nd ch from the hook, 36 sc (37); ch 2 and turn
Row 2: dc even (37); ch 1 and turn
Row 3: sc even (37); ch 2 and turn
Rows 4 - 23: rep rows 2-3; F/O and cut the yarn
BLANKET PANEL B (turquoise yarn; work in rows)
Row 1: 38 ch, 1 sc into the 2nd ch from the hook, 36 sc (37); ch 2 and turn
Row 2: 1 dc into the 1st st, 1 ch, (skip one st, 1 bo, ch 1, skip 1 st, work 1 dc into the next st) rep 9 times (19 sts, 9 chs); ch 1 and turn
Row 3: 1 sc into the dc st, (1 sc into the space between the dc and the bobble st, 1 sc into the bobble st, 1 sc into the ch space, 1 sc into the dc st) rep 9 times (37); ch 2 and turn
Rows 4 - 23: rep rows 2-3; DO NOT F/O
Do not F/O or cut the yarn. Place the two panels together, matching up all sides and making sure the right side of the bubble panel is facing outwards. Start joining the panels by crocheting the edges together with single crochet stitches. Work 4 sc stitches in each corner. F/O, cut the yarn and wave in end.
HEAD (white yarn)
Rnd 1: 8 sc in a mr (8)
Rnd 2: sc inc around (16)
Rnd 3: (1 sc, 1 sc inc) rep around (24)
Rnd 4: (2 sc, 1 sc inc) rep around (32)
Rnd 5: (3 sc, 1 sc inc) rep around (40)
Rnd 6 - 10: sc even (40)
Rnd 11: (4 sc, 1 sc inc) rep around (48)
Rnd 12 - 13: sc even (48)
Rnd 14: (5 sc, 1 sc inc) rep around (56)
Rnd 15 - 17: sc even (56)
Insert plastic safety eyes between rnds # 10-11, 11 sts apart.
Rnd 18: (5 sc, 1 sc dec) rep around (48)
Rnd 19: (2 sc, 1 sc dec) rep around (36)
Rnd 20: (1 sc, 1 sc dec) rep around (24)
Rnd 21: (1 sc, 1 sc dec) rep around (16); finish stuffing the head
Rnd 22: sc dec even (8); F/O, close the hole and wave in end.
Embroider the NOSE with turquoise yarn.
Embroider the EYELASHES and the EYEBROWS with black cotton thread
EARS (white yarn; make two)
Rnd 1: 6 sc in a mr (6)
Rnd 2: sc inc around (12)
Rnd 3: (5 sc, 1 sc inc) rep twice (14)
Rnd 4: (6 sc, 1 sc inc) rep twice (16)
Rnd 5: (7 sc, 1 sc inc) rep twice (18)
Rnd 6: (8 sc, 1 sc inc) rep twice (20)
Rnds 7 - 10: sc inc around (20)
Rnd 11: (3 sc, 1 sc dec) rep around (16)
Rnd 12: sc even (16)
Rnd 13: (2 sc, 1 sc dec) rep around (12)
Rnds 14 - 15: sc even (12)
Rnd 16: (1 sc, 1 sc dec) rep around (8)
Rnd 17: sc even (8); F/O and leave a long strand of yarn to sew the ear to the top of the head between rnds #1-5
LEGS (white yarn; make 4)
Rnd 1: 6 sc in a mr (6)
Rnd 2: sc inc around (12)
Rnd 3: sc even (12)
Rnd 4: (1 sc, 1 sc dec) rep around (8)
Rnd 5: sc inc around (16)
Row 7: flatten the limb and work through both layers, 8 sc (48); ch 1 and turn
Row 8: 2 sc, 2 sc dec, 2 sc (6); ch 2 and turn
Row 9: (1 bo, 1 sl st into the next st) rep 3 times (6); F/O and wave in end.
Use a strand of turquoise yarn to attach the limbs to the blanket’s corners.
pom-pom (white yarn)
Wrap white yarn around your index and middle fingers. Wrap until you get the desired amount of yarn. Gently pull the yarn off the yarn of your fingers, wrap another piece around the center of the yarn ball.
Tie it tight to secure. Trim to form. Use the yarn ends to attach the pom-pom to the center of the lower side of the blanket.


I can't wait to see your version of my BUNNY SAFETY BLANKET! Feel free to tag me (@elisascrochet) in your photos on Instagram or Facebook if you'd like!
Elisa
This pattern is an original pattern by Elisa Sartori of Elisa's Crochet. Please do not claim this pattern as your own. If you wish to share this pattern, you may link to this pattern but please do not reprint it on your site. You may keep a copy for your own personal use but please DO NOT sell the pattern or distribute it.
You may sell products made from this pattern but please clearly credit the design to me, Elisa Sartori of Elisa's Crochet. Permission is NOT granted for mass production or factory manufacturing of any kind. Thank you!