
Spring Bunny Free Crochet Pattern
- Elisa
- Apr 9, 2019
- 5 min read

Updated: Oct 19, 2019

Winter is finally over here in Michigan and I can't wait to kick off the new season with some Spring crochet projects! With Easter around the corner it's time to get ready for egg hunts, Easter gifts, Easter favors...
Among sheep, chicks and other adorable animals, bunnies are the most popular around this time of the year... so just put together a sweet design and some cute pastel colors and you are ready to roll!
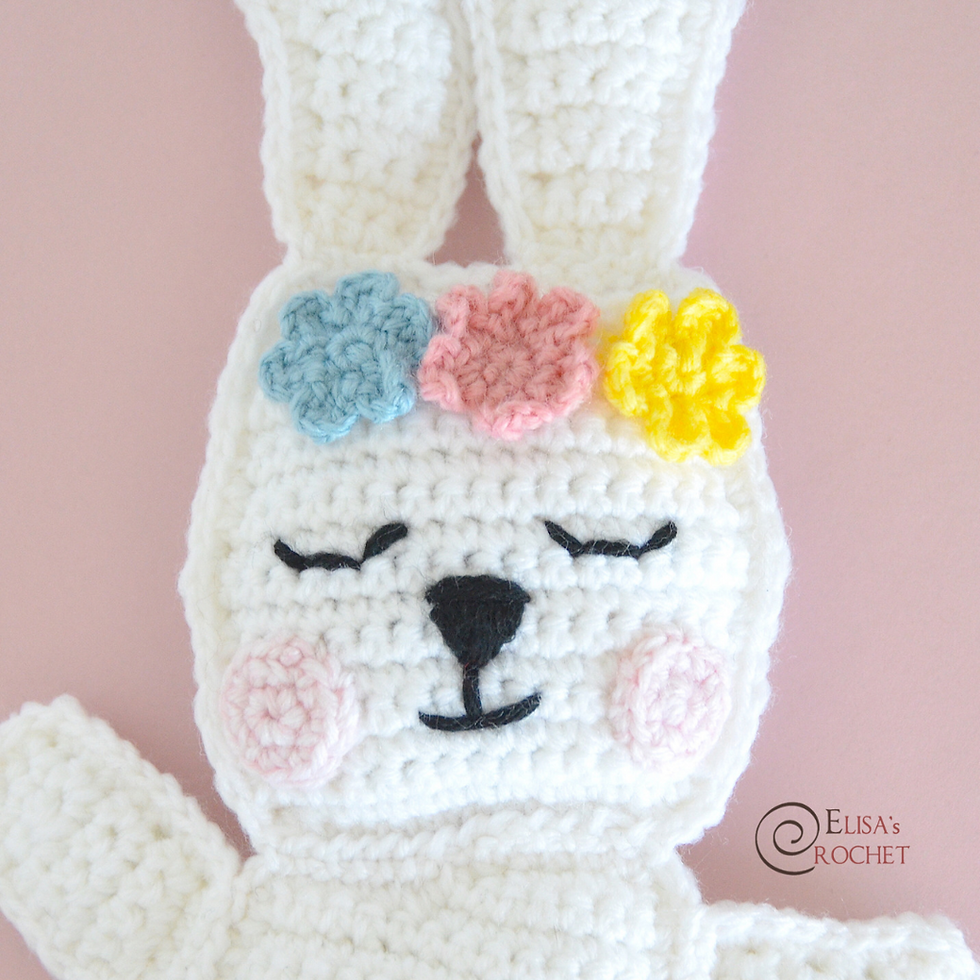
Today I want to share with you my cute flat Amigurumi Spring Bunny!
This is an easy and quick amigurumi project perfect for beginners crocheters.
It mainly requires to work in rows (instead of rounds) and create matching panels that are going to be sewn together.
Here's the free pattern...ENJOY!
SKILL LEVEL: Beginner
YARN: Light Weight Yarn (Lace 3) in White, Light Pink, Dark Pink, Yellow, Light Blue and Black
HOOK SIZES: 3.25 mm and 2.5 mm
OTHER MATERIALS: Polyester Fiber Filling
DIMENSION: the finished doll is approximately 11 inches long
STITCHES USED and ABBREVIATIONS: stitch (st), slip stitch (sl st), single crochet (sc), decrease (dec), increase (inc), fasten off (F/O), magic ring (mr)
INSTRUCTIONS:
Work in rows otherwise instructed; ch1 and turn at the end of each row.


Disclosure. Most blog posts on this website contain affiliate links. This means I get a small commission if you click-through & purchase (no additional cost to you).
HEAD (white yarn; 3.25 mm hook; make two)
1) 15 ch, 1 sc in the 2nd ch from the hook, 13 sc (14)
2) sc even (14)
3) inc, 12 sc, inc (16)
4-6) sc even (16)
7) inc, 14 sc, inc (18)
8-9) sc even (18)
10) dec, 14 sc, dec (16)
11-13) sc even (16)
14) dec, 12 sc, dec (14)
15) sc even (14)
16) dec, 10 sc, dec (12); F/O
Place the two head panels together, matching up all sides.
Begin attaching the panels together by chaining one and single crocheting around the edges.
Stuff the head lightly as you sew the two parts together.
Embroider the EYES, the NOSE and the MOUTH with some scrap black yarn.
CHEECK BLUSHING (pink yarn; 3.25 mm hook; make two)
Work in round
1) 6 sc in a magic ring (6)
2) inc around (12); F/O and leave a long tail of yarn to sew the rounded pieces onto the doll's face.

FLOWERS (dark pink, blue and yellow yarn; 2.5 mm hook; make one for each color)
Work in round
1) 6 sc in a magic ring (6)
2) *3 ch, 1 dc, 3 ch, 1 sl st in the same st*, repeat ** 6 times (18); F/O and leave a long tail of yarn to sew the flower onto the doll’s forehead.

EARS (white yarn; 3.25 mm hook)
Ear #1 (make two)
1) 5 ch, 1 sc in the 2nd ch from the hook, 3 sc (4)
2-3) sc even (4)
4) 2 sc, 1 inc, 1 sc (5)
5-6) sc even (5)
7) 1 inc, 4 sc (6)
8) 1 dec, 3 sc, 1 inc (6)
9) 1 inc, 3 sc, 1 dec (6)
10) 4 sc, 2 inc (8)
11) 1 inc, 5 sc, 1 dec (8)
12) 2 dec, 4 sc (6)
13) 4 sc, 1 dec (5); F/O and leave a long tail of yarn.
Place the two ear panels together, matching up all sides.
Begin attaching the panels together by chaining one and single crocheting around the edges.
Stuff the ear lightly as you sew the two parts together.
Ear #2 (make two)
1) 5 ch, 1 sc in the 2nd ch from the hook, 3 sc (4)
2-3) sc even (4)
4) 2 sc, 1 inc, 1 sc (5)
5-6) sc even (5)
7) 2 sc, 1 inc, 2 sc (6)
8-9) sc even (6)
10) 1 inc, 4 sc, 1 inc (8)
11-12) sc even (8)
13) 1 dec, 4 sc, 1 dec (6)
14) 2 sc, 1 dec, 2 sc (5)
15) 2 sc, 1 dec, 1 sc (4); F/O and leave a long tail of yarn.
Place the two ear panels together, matching up all sides.
Begin attaching the panels together by chaining one and single crocheting around the edges.
Stuff the ear lightly as you sew the two parts together.
Sew the two ears to the upper side of the doll’s head.

BODY (white yarn; 3.25 mm hook; make two)
1) 15 ch, 1 sc in the 2nd ch from the hook, 13 sc (14)
2) sc even (14)
3) 1 inc, 12 sc, 1 inc (16)
4-15) sc even (16)
16) 1 dec, 12 sc, 1 dec (14)
17-19) sc even (14)
20) 1 dec, 10 sc, 1 dec (12)
21) 7 sc, 1 sl st (8)
22) 1 dec, 6 sc (7)
23) 5 sc, 1 sl st dec (6); F/O and leave a long tail of yarn.
Place the two body panels together, matching up all sides.
Begin attaching the panels together by chaining one and single crocheting around the edges.
Stuff the body lightly as you sew the two parts together.
Attach the body to the doll’s head.
BELLY (white yarn; 3.25 mm hook)
1) 11 ch, 1 sc in the 2nd ch from the hook, 9 sc (10)
2-9) sc even (10)
10) 4 sc, 1 dec, 4 sc (9)
11-12) sc even (9)
13) sc all around the panel; F/O and leave a long tail of yarn to attach the belly to the doll’s body.
FRONT LEG (white yarn; 3.25 mm hook; make two)
Leg #1
1) 5 ch, 1 sc in the 2nd ch from the hook, 3 sc (4)
2-3) sc even (4)
4) 2 sc, 1 inc, 1 sc (5)
5-8) sc even (5); F/O and leave a long tail of yarn.
Place the two leg panels together, matching up all sides.
Begin attaching the panels together by chaining one and single crocheting around the edges.
Stuff the leg lightly as you sew the two parts together.
Leg #2
1) 5 ch, 1 sc in the 2nd ch from the hook, 3 sc (4)
2-3) sc even (4)
4) 2 sc, 1 inc, 1 sc (5)
5) 1 dec, 2 sc, 1 inc (5)
6) 1 inc, 2 sc, 1 dec (5)
7-8) sc even (5); F/O and leave a long tail of yarn.
Place the two leg panels together, matching up all sides.
Begin attaching the panels together by chaining one and single crocheting around the edges.
Stuff the leg lightly as you sew the two parts together.
Sew the two front legs to the upper sides of the doll’s body.
BACK LEGS (white yarn; 3.25 mm hook; make four)
1) 5 ch, 1 sc in the 2nd ch from the hook, 3 sc (4)
2-3) sc even (4)
4) 2 sc, 1 inc, 1 sc (5)
5) sc even (5)
6) 2 sc, 1 inc, 2 sc (6)
7) sc even (6)
8) 3 sc, 1 inc, 2 sc (7)
9) sc even (7); F/O and leave a long tail of yarn.
Place the two leg panels together, matching up all sides.
Begin attaching the panels together by chaining one and single crocheting around the edges.
Stuff the leg lightly as you sew the two parts together.
Sew one back leg to the bottom right side of the doll’s body pointing down.
Sew the other one to the left side of the doll’s body pointing left.
TAIL (white yarn; 3.25 mm hook; make two)
Work in round
1) work 6 sc in a mr (6); do not join, ch1 and turn
2) 2 sc in each st (12); F/O
Place the two tail panels together, matching up all sides.
Begin attaching the panels together by chaining one and single crocheting around the edges.
Sew the tail in between the left leg and the body as shown in the picture.
I can't wait to see your version of my SPRING BUNNY! Feel free to tag me (@elisascrochet) in your photos on Instagram or Facebook if you'd like!
Elisa
This pattern is an original pattern by Elisa Sartori of Elisa's Crochet. Please do not claim this pattern as your own. If you wish to share this pattern, you may link to this pattern but please do not reprint it on your site. You may keep a copy for your own personal use but please DO NOT sell the pattern or distribute it.
You may sell products made from this pattern but please clearly credit the design to me, Elisa Sartori of Elisa's Crochet. Permission is NOT granted for mass production or factory manufacturing of any kind. Thank you!


